A product demo builder turns your software into a clickable, guided walkthrough that anyone can explore from a link or an embed. No sales call, no screen share, no "let me just log in." This page walks through how to build one with LiveDemo, using screenshots of the actual product, and covers the decisions that make a demo convert.
If you're still comparing tools, start with our guide to the best interactive demo software. If you already know you want to build one, read on.
What you'll have at the end
A finished interactive demo looks like this one, built for Bolt.new. It's a handful of captured screens, each with a hotspot that tells the viewer what to click next.
Before you start: write the story, not the feature list
Most demos fail before anyone opens the builder. They try to show every menu. Buyers don't want a tour of your settings. They want to see the moment your product solves their problem.
Answer three questions before you capture anything:
- Who is watching? A visitor on your pricing page, a prospect after a sales call, and a new user in onboarding need different demos.
- What's the "aha" moment? The one screen where the value becomes obvious, such as a finished report, a deployed app or a resolved ticket.
- What should they do next? Start a trial, book a call, or go to a help article. Pick one.
Then plan 5 to 7 steps that get from a familiar starting point to that "aha" moment as directly as possible.
Step 1: install a capture tool
LiveDemo captures from wherever your product lives:
- Chrome extension for web apps and websites. This covers most SaaS products.
- Figma plugin for demos of designs and prototypes, useful before a feature ships.
- macOS and Windows apps for desktop software, or when you want to capture outside the browser.
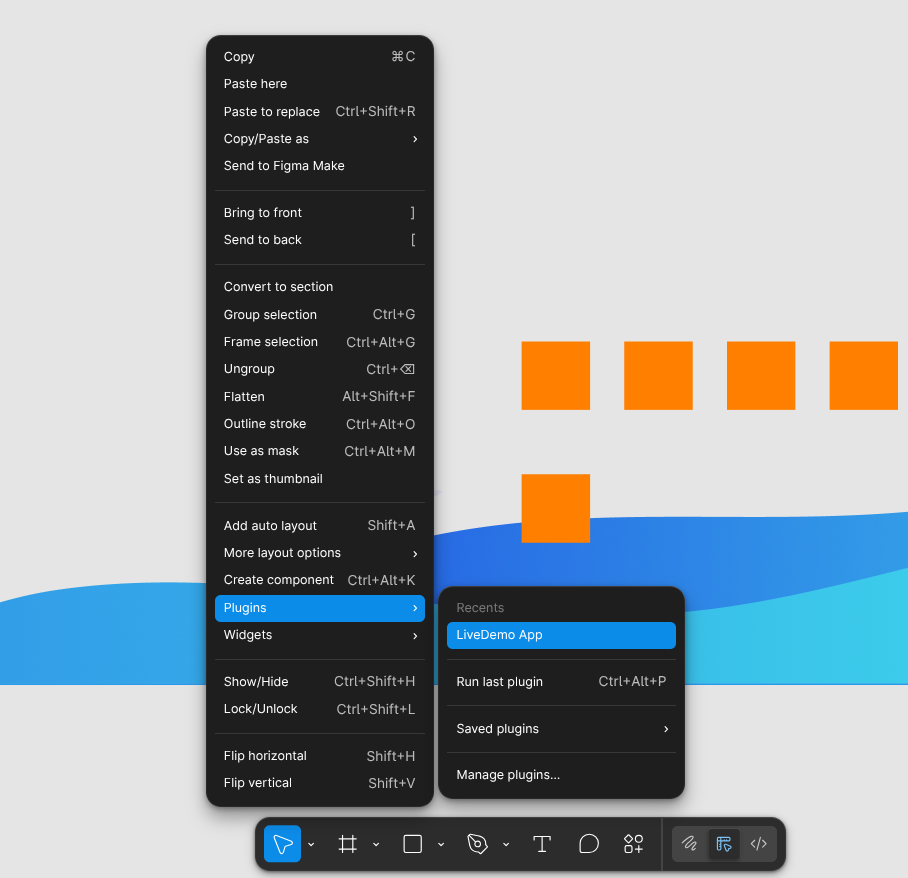
Install the extension from the Chrome Web Store and sign in. The installation guide has screenshots of each step.
Step 2: choose manual or AI recording
Open the page you want to start from and click the LiveDemo icon. Name the demo, then pick a recording mode.
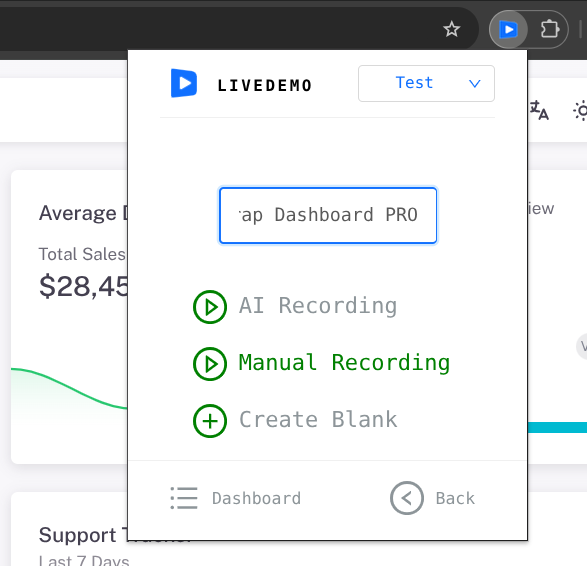
Manual recording turns each click into a step. Use it when you know exactly which path you want to show, which is most of the time.
AI recording lets you browse naturally. When you stop, LiveDemo suggests a few demo storylines based on what you did, and you choose which one to turn into a demo. It helps when you're exploring a complex flow and aren't sure which path tells the best story.
Create blank starts an empty demo, so you can upload your own images or video.
Click through your flow at a steady pace. If you take a wrong turn, keep going: deleting a step later takes one click.
Step 3: edit the steps
When you stop recording, the demo opens in the editor. The left panel lists every captured screen. The right side shows the selected step as the viewer will see it.
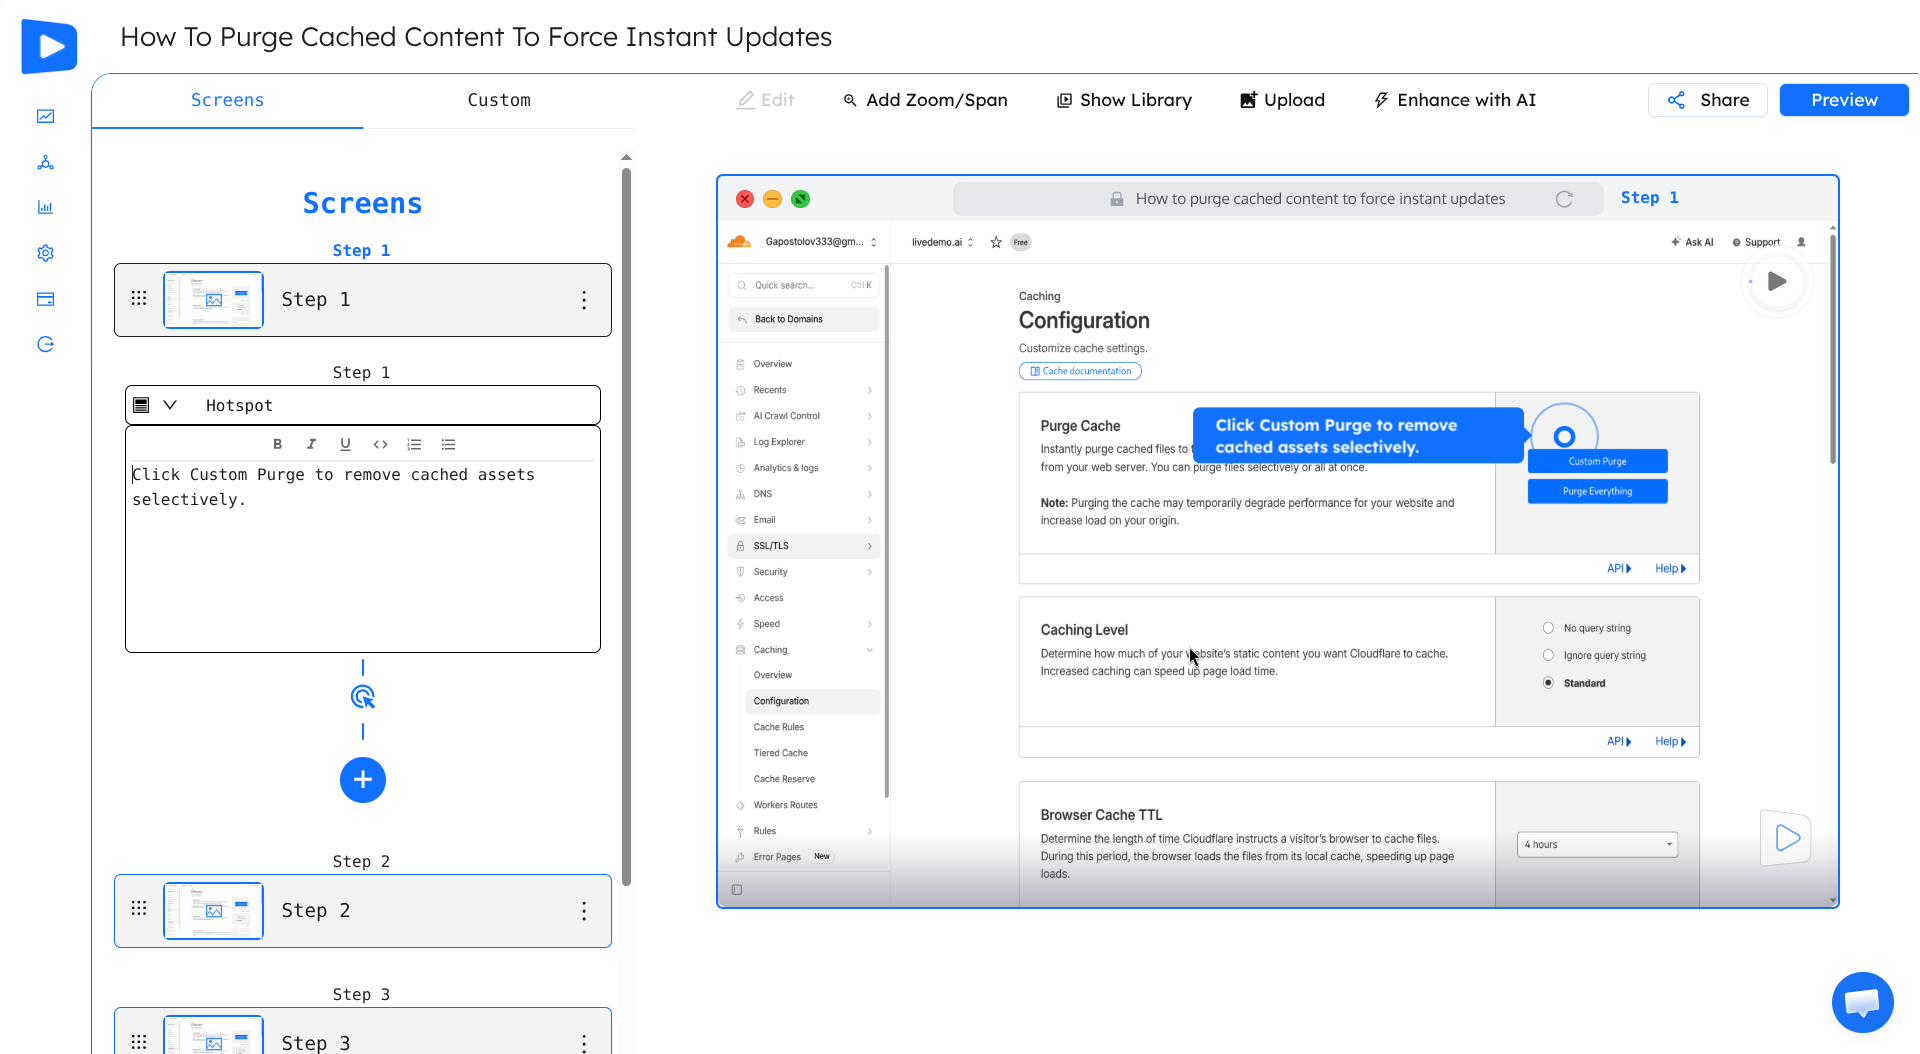
For each step, do three things:
- Rewrite the tooltip. Replace "Click here" with what the viewer gets: "Click Custom Purge to remove cached assets selectively." Lead with the verb and the outcome.
- Check the hotspot. Make sure it sits on the element the buyer should click.
- Delete anything that doesn't serve the story. Login screens, loading states and detours rarely belong in a demo.
Then use the toolbar to polish:
- Add Zoom/Pan to focus attention on a small part of a busy screen.
- Enhance with AI to tighten copy or generate voiceover.
- Design to match your brand colors and fonts, so the demo looks like part of your site.
- Call to action on the last step, with a button to start a trial or book a call.
If you used HTML capture, you can also edit the captured page itself. Replace a real customer name with a sample one, or update a number that changed since you captured it.
Step 4: personalize it, or let an AI agent run it
The same demo can be adapted for different audiences. Personalization variables swap in a prospect's company name or industry, and AI text personalization rewrites copy for a given persona. AI text personalization and AI voiceover are included even on the free plan.
On the Growth plan ($49/mo), you can turn a demo into an Agentic Demo. Instead of following fixed tooltips, an AI agent guides each buyer through the product, answers their questions in context and adapts the walkthrough. It's the closest thing to a sales engineer who's available at 3 a.m.
Step 5: share and embed
Click Share and pick where the demo goes:
- Public link for emails, LinkedIn posts and sales follow-ups.
- Website embed (an iframe) for your homepage, landing pages, docs or help center. See how to embed a demo on your website.
- GIF or MP4 export for places that can't run an iframe, such as social posts, app store listings or release notes. See exporting a demo as GIF or video.
On Pro and above, add a lead capture form before or during the demo to collect emails from high-intent viewers.
Step 6: measure and improve
Publishing is the halfway point. The analytics page shows how each demo performs: views, unique users, time spent, engagement rate, completion rate and captured leads.
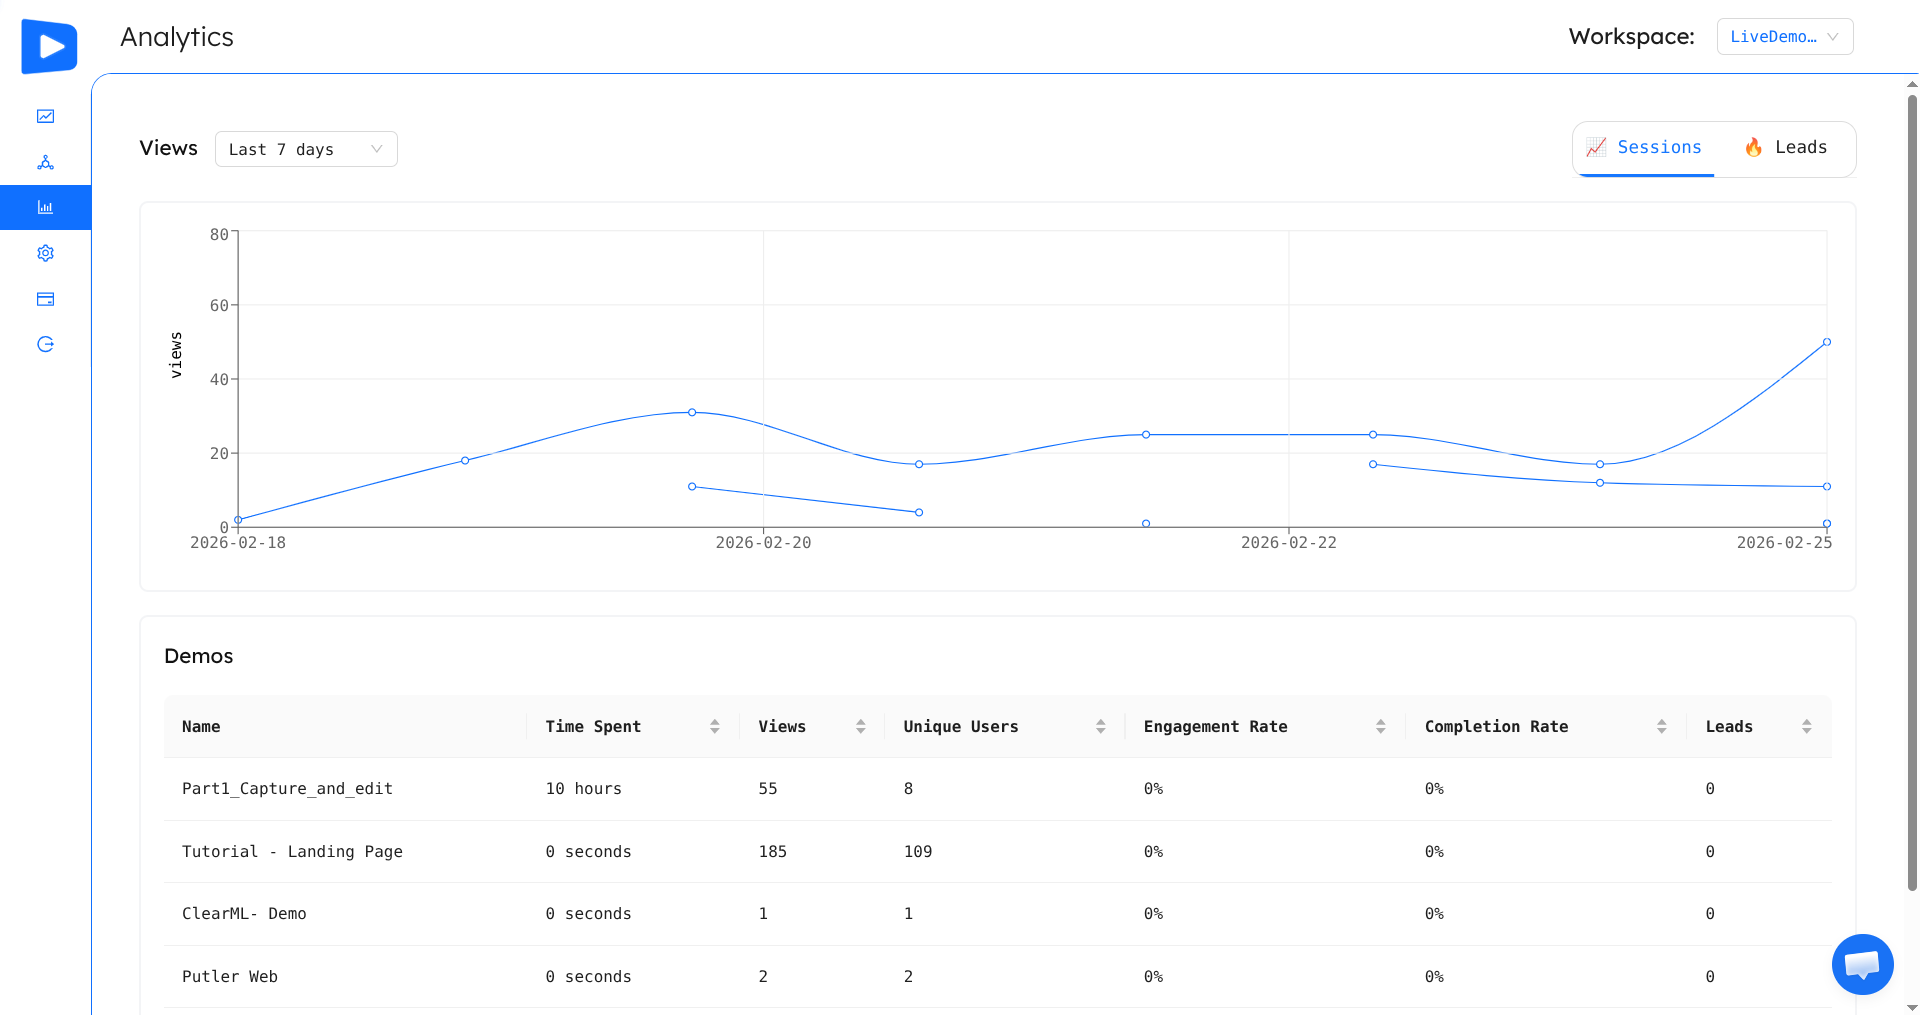
Look at drop-off by step. If half your viewers leave on step 3, that step is confusing or too slow. Rewrite the tooltip, add a zoom, or cut it. Small edits like these often lift completion rate more than any redesign.
Common mistakes to avoid
- Too many steps. Past 7 to 10 steps, completion drops sharply. Split long flows into several short demos.
- Starting with setup. Lead with the result, then show how easy it was to get there.
- Vague tooltips. "Next" and "Click here" waste the viewer's attention. Say what happens.
- No call to action. A viewer who finishes your demo is your warmest lead. Tell them what to do.
- Stale screens. Re-capture after major UI changes. HTML captures let you patch small text changes without re-recording.
Limits worth knowing
LiveDemo captures what's on screen. It doesn't clone your backend, so viewers can't type arbitrary data and get real results. For that you'd need a sandbox product like Reprise or Demostack, at a much higher price. The free plan is limited to one creator and 3 published demos, and lead capture starts on Pro.
Start building
The quickest way to learn a demo builder is to build one. Pick your single most important flow, give yourself 10 minutes, and publish it. If it gets views and completions, build the next one. See more interactive demo examples for inspiration, or read the full documentation.